Many people choose to practice yoga after knee replacement surgery. A regular yoga practice offers many medical benefits, such as reduced stress and increased strength and flexibility. It can also help you mentally and physically in the healing process after surgery.
But if you are recovering from knee replacement surgery and would like to start a practice or continue practicing yoga, you should be aware of poses and modifications that can assist in the healing process.
How Yoga Can Help After a Knee Replacement
Your knees are an integral part of your body's overall motion and movement. Knee replacement surgery is typically conducted to replace a worn-out joint with an artificial one. This procedure helps many people return to an active lifestyle. But the American Academy of Orthopedic Surgeons (AAOS) tells us you will need plenty of healing time.
After this type of surgery, the AAOS says, the knee joint needs to be guarded against certain activities. Exercises like jumping, jogging, or skiing will put sudden pressure on the joint and can cause injury. Dr. Carlos Guanche, an experienced orthopedic surgeon based in Van Nuys, CA, says that yoga provides a safe exercise option after knee replacement. "After about six weeks, yoga is a great way to strengthen all the muscles around the knee," he says.
Improves Range of Motion
While you should stay away from more intense forms of exercise, your new knee does need to move. According to the AAOS, if you rest too much the muscles around your joint can get stiff.
A yoga practice can help you regain your sense of balance, develop new awareness in the knee area, and strengthen your surrounding joint and muscle areas to support your knee replacement.
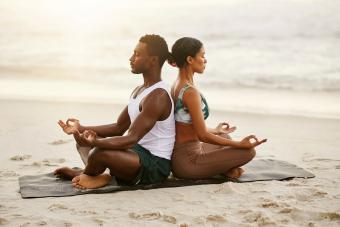
Provides Stress Relief
Having surgery can feel overwhelming. The deep breathing and meditative qualities of yoga have been shown to relax your body by activating the part of your brain that tells you everything is okay after a period of danger.
Holding yoga poses and the breathing patterns that come with the practice calm your heart rate and relax your muscles. Your body will heal best under these conditions.
How to Choose Healing Yoga Poses
Yoga practitioners can choose from many yoga poses, or asanas, to help with the healing process. One of the main keys is to incorporate poses that focus on building strength and alignment in the knee's surrounding muscles and all the muscles which affect the knee: the hips, thighs, and ankles.
Dr. Guanche says you can choose any pose you like. "It really depends on what hurts or irritates the knee," he says. Be sure to ask your doctor or physical therapist about the yoga poses you want to try, listen to your body while you do them, and stop if it hurts.
"Yoga with modifications can be very beneficial for range of motion," says Dawn Call, PTA, a physical therapist with more than 30 years of experience. "Balance poses such as Tree Pose and other single limb stance poses are beneficial for balance and strength." Dawn did caution, however, that you should avoid any twisting poses while your knee is healing.
When starting a brand new yoga practice, avoid poses that will put too much strain on the knees. Begin with simple poses and work your way up slowly to more difficult asanas.
Yoga Poses to Try After Knee Replacement
While you have many to choose from, here are some great poses you can try if you are recovering from knee replacement surgery.

Mountain Pose (Tadasana)
Mountain Pose is a starting position for many yoga routines. This pose can calm your mind and shift your focus to your body. The more you do this pose, you may notice your posture improving throughout the day. To do Mountain Pose:
- Stand with your feet together and toes pointing forward.
- Straighten your legs, but don't lock your knees.
- Roll your shoulders back and relax your shoulders down and away from your head and neck.
- Hold your arms at your sides with open palms facing forward.
- Breathe deeply 10 times, then release the pose.
Modification: If you feel pain when you stand with your feet together, you may shift your feet apart.
Standing Forward Bend (Uttanasana)
This pose stretches your hamstring and calves. If these muscle groups are tight, they can increase knee pain, so keeping them loose and limber can help your recovery. To do Standing Forward Bend:
- Stand with your feet together, toes pointing forward.
- Bend forward at the hips, reaching down with your hands.
- Touch the floor if you can, or grab your ankles.
- Hold the pose for 30 seconds to a minute.
Modification: You can bend to a lesser degree and hold on to your thighs or any place on your leg that feels comfortable. You can also place your hands on a block or a chair.
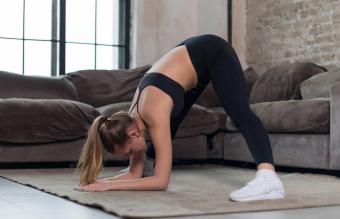
Downward Facing Dog (Adho Mukha Svanasana)
Downward Dog is a well-known and popular pose among yoga enthusiasts and beginners alike. It stretches the back of your body while strengthening your core and limbs. It often serves as a jumping-off point for other asanas. To do the Downward Facing Dog Pose:
- Get down on your hands and knees, with your hips above your knees and your hands a bit in front of your shoulders.
- Lift your knees off the ground as you exhale.
- With your next exhale, push your heels and hands into the ground.
- Hold the pose for at least 10 deep breaths, then relax back to your knees.
Modification: If straightening your legs hurts your knee, you can leave your knees bent.
Warrior I (Virabhadrasana I)
With this pose, you will stretch your ankles, calves, upper body, and arms. You will also strengthen your thigh and back muscles. To do Warrior I Pose:
- Start in the Downward Facing Dog Pose.
- Bring one foot forward and place it between your hands.
- Bend your front knee, bringing it over your ankle.
- Move your back foot at a 45-degree angle to your mat.
- Exhaling, lift your torso away from the floor and bring your arms above your head.
- Hold the pose for five to 10 breaths, return to Downward Facing Dog and repeat on the other side.
Modification: Bend your front knee less, so that the lunge is not as deep.
Tree Pose (Vrksasana)
Tree Pose is great for building strength in your legs, back, and core. The pose also helps to improve balance and posture. To do Tree Pose:
- Start in Mountain Pose, and lift one foot to rest on the opposite inner thigh.
- Be sure to place your foot high enough on your thigh so that is fully above your knee (and there is no pressure on the knee).
- Hold your hands palm to palm over your heart, or extend them over your head.
- Take 10 breaths, then return to Mountain and repeat on your other side.
Modification: You can place your foot against the opposite leg just above the ankle, or if you need more stabililty, rest the toes on the floor. You can also perform this pose sitting in a chair or lying on the floor. If you're unsure of your balance, but want to try it standing, do the pose next to a wall.
Modifications and Props
Even the most experienced yogis use modifications in their yoga practice after knee replacement to avoid injuring or straining the knee. For example, if your practice incorporates Warrior Pose, pay special attention to make sure your knee does not twist out or fall in towards the midline of the body.
Don't be afraid to use props or bolsters in your yoga practice. Use blocks, blankets, straps, and even the wall to give yourself added balance and support. Chairs are great support tools, as well. Consider easing back into your home practice with one of many available yoga DVDs.
More Yoga Tips to Protect Your Knees
Exercise caution and restraint when practicing yoga after knee replacement. Make sure your doctor gives approval before incorporating a yoga practice into your recovery process. If you are starting a new practice, wait until your knee has sufficiently healed from the initial surgery.
If you go to a formal yoga studio or class, tell your teacher about your surgery to so that they can suggest modifications and poses to avoid reinjuring your knee. Be careful when transitioning from pose to pose. You may feel comfortable and secure in a pose, but then lose your balance when moving into a new pose. Take as much time as you need in each transition.
Have several available balance props, such as a chair or wall, within your reach at all times during your practice. Avoid asanas that involve pivoting or twisting in the lower body or poses that require holding deep knee bends for long periods. Remember that you should not feel pain while holding a pose. If you feel pain, stop right away and modify it before you try again.
Yoga can be a fantastic way to ease your new knee joint into more and more movement and activity. Have fun with it!